1.1、環境
| linux-node1(master服務端) | 192.168.0.15 |
| linux-node2(minion客戶端) | 192.168.0.16 |
1.2、SaltStack三種運行模式介紹
| Local | 本地 |
| Master/Minion | 傳統運行方式(server端跟agent端) |
| Salt SSH | SSH |
1.3、SaltStack三大功能
- 遠程執行
- 配置管理
- 雲管理
1.4、SaltStack安裝基礎環境準備
[root@linux-node1 ~]# cat /etc/redhat-release ##查看系統版本
CentOS release 6.7 (Final)
[root@linux-node1 ~]# uname -r ##查看系統內核版本
2.6.32-573.el6.x86_64
[root@linux-node1 ~]# getenforce ##查看selinux的狀態
Enforcing
[root@linux-node1 ~]# setenforce 0 ##關閉selinux
[root@linux-node1 ~]# getenforce
Permissive
[root@linux-node1 ~]# /etc/init.d/iptables stop
[root@linux-node1 ~]# /etc/init.d/iptables stop
[root@linux-node1 ~]# ifconfig eth0|awk -F ‘[: ]+’ ‘NR==2{print $4}’ ##過濾Ip地址
192.168.0.15
[root@linux-node1 ~]# hostname ##查看主機名
linux-node1.zhurui.com
[root@linux-node1 yum.repos.d]# wget -O /etc/yum.repos.d/epel.repo http://mirrors.aliyun.com/repo/epel-6.repo ##安裝salt必須使用到epel源
1.4、安裝Salt
服務端:
[root@linux-node1 yum.repos.d]# yum install -y salt-master salt-minion ##salt-master包跟salt-minion包
[root@linux-node1 yum.repos.d]# chkconfig salt-master on ##加入到開機自動啟動
[root@linux-node1 yum.repos.d]# chkconfig salt-minion on ##加入到開機自動啟動
[root@linux-node1 yum.repos.d]# /etc/init.d/salt-master start ##啟動salt-master
Starting salt-master daemon: [ OK ]
啟動到這裡需要修改minion配置文件,才能啟動salt-minion服務
[root@linux-node1 yum.repos.d]# grep ‘^[a-z]’ /etc/salt/minion
master: 192.168.0.15 ##指定master主機
[root@linux-node1 yum.repos.d]# cat /etc/hosts
192.168.0.15 linux-node1.zhurui.com linux-node1 ##確認主機名是否解析
192.168.0.16 linux-node2.zhurui.com linux-node2
解析結果:
- [root@linux-node1 yum.repos.d]# ping linux-node1.zhurui.com
- PING linux-node1.zhurui.com (192.168.0.15)56(84) bytes of data.
- 64 bytes from linux-node1.zhurui.com (192.168.0.15): icmp_seq=1 ttl=64 time=0.087 ms
- 64 bytes from linux-node1.zhurui.com (192.168.0.15): icmp_seq=2 ttl=64 time=0.060 ms
- 64 bytes from linux-node1.zhurui.com (192.168.0.15): icmp_seq=3 ttl=64 time=0.053 ms
- 64 bytes from linux-node1.zhurui.com (192.168.0.15): icmp_seq=4 ttl=64 time=0.060 ms
- 64 bytes from linux-node1.zhurui.com (192.168.0.15): icmp_seq=5 ttl=64 time=0.053 ms
- 64 bytes from linux-node1.zhurui.com (192.168.0.15): icmp_seq=6 ttl=64 time=0.052 ms
- 64 bytes from linux-node1.zhurui.com (192.168.0.15): icmp_seq=7 ttl=64 time=0.214 ms
- 64 bytes from linux-node1.zhurui.com (192.168.0.15): icmp_seq=8 ttl=64 time=0.061 ms
[root@linux-node1 yum.repos.d]# /etc/init.d/salt-minion start ##啟動minion客戶端
Starting salt-minion daemon: [ OK ]
[root@linux-node1 yum.repos.d]#
客戶端:
[root@linux-node2 ~]# yum install -y salt-minion ##安裝salt-minion包,相當於客戶端包
[root@linux-node2 ~]# chkconfig salt-minion on ##加入開機自啟動
[root@linux-node2 ~]# grep ‘^[a-z]’ /etc/salt/minion ##客戶端指定master主機
master: 192.168.0.15
[root@linux-node2 ~]# /etc/init.d/salt-minion start ##接着啟動minion
Starting salt-minion daemon: [ OK ]
1.5、Salt秘鑰認證設置
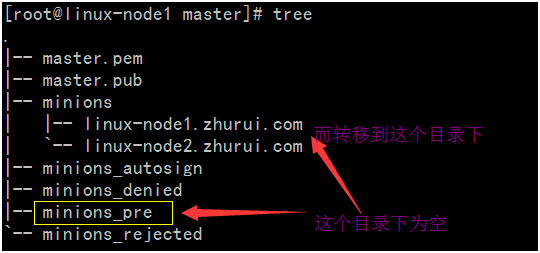
1.5.1使用salt-kes -a linux*命令之前在目錄/etc/salt/pki/master目錄結構如下


1.5.2使用salt-kes -a linux*命令將秘鑰通過允許,隨後minions_pre下的文件會轉移到minions目錄下
- [root@linux-node1 minion]# salt-key -a linux*
- The following keys are going to be accepted:
- UnacceptedKeys:
- linux-node1.zhurui.com
- linux-node2.zhurui.com
- Proceed?[n/Y] Y
- Keyfor minion linux-node1.zhurui.com accepted.
- Keyfor minion linux-node2.zhurui.com accepted.
- [root@linux-node1 minion]# salt-key
- AcceptedKeys:
- linux-node1.zhurui.com
- linux-node2.zhurui.com
- DeniedKeys:
- UnacceptedKeys:
- RejectedKeys:
-

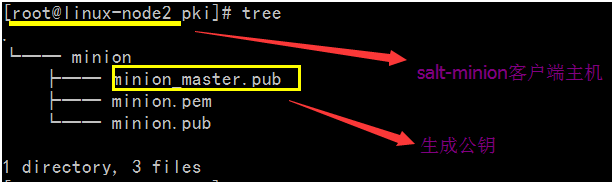
1.5.3此時目錄機構變化成如下:
1.5.4並且伴隨着客戶端/etc/salt/pki/minion/目錄下有master公鑰生成
1.6、salt遠程執行命令詳解
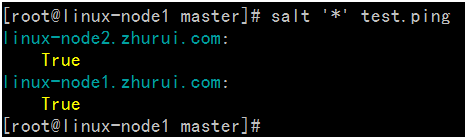
1.6.1 salt ‘*’ test.ping 命令
[root@linux-node1 master]# salt ‘*’ test.ping ##salt命令 test.ping的含義是,test是一個模塊,ping是模塊內的方法
linux-node2.zhurui.com:
True
linux-node1.zhurui.com:
True
[root@linux-node1 master]#
1.6.2 salt ‘*’ cmd.run ‘uptime’ 命令

1.7、saltstack配置管理
1.7.1編輯配置文件/etc/salt/master,將file_roots注釋去掉

1.7.2接着saltstack遠程執行如下命令
[root@linux-node1 master]# ls /srv/
[root@linux-node1 master]# mkdir /srv/salt
[root@linux-node1 master]# /etc/init.d/salt-master restart
Stopping salt-master daemon: [ OK ]
Starting salt-master daemon: [ OK ]
[root@linux-node1 salt]# cat apache.sls ##進入到/srv/salt/目錄下創建

[root@linux-node1 salt]# salt ‘*’ state.sls apache ##接着執行如下語句
接着會出現如下報錯:
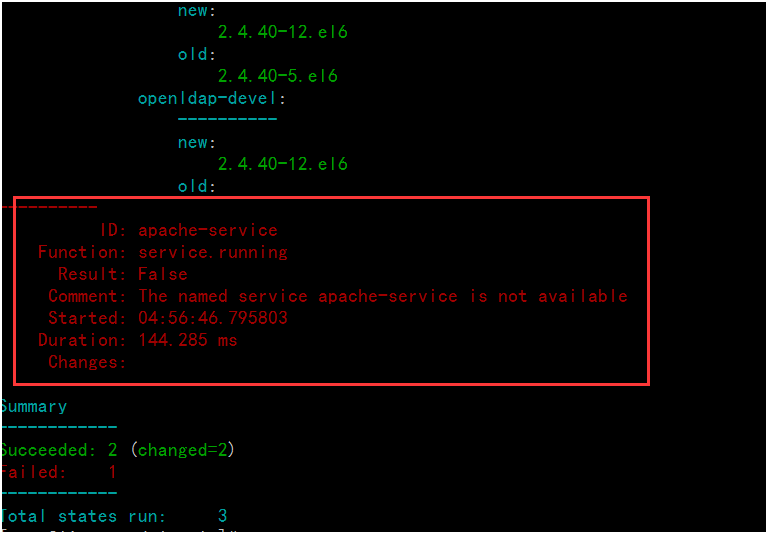
便捷apache.sls文件添加如下:

最後成功如下:
- [root@linux-node1 salt]# salt ‘*’ state.sls apache
- linux-node2.zhurui.com:
- ———-
- ID: apache-install
- Function: pkg.installed
- Name: httpd
- Result:True
- Comment:Package httpd is already installed.
- Started:22:38:52.954973
- Duration:1102.909 ms
- Changes:
- ———-
- ID: apache-install
- Function: pkg.installed
- Name: httpd-devel
- Result:True
- Comment:Package httpd-devel is already installed.
- Started:22:38:54.058190
- Duration:0.629 ms
- Changes:
- ———-
- ID: apache-service
- Function: service.running
- Name: httpd
- Result:True
- Comment:Service httpd has been enabled, and is running
- Started:22:38:54.059569
- Duration:1630.938 ms
- Changes:
- ———-
- httpd:
- True
- Summary
- ————
- Succeeded:3(changed=1)
- Failed:0
- ————
- Total states run:3
- linux-node1.zhurui.com:
- ———-
- ID: apache-install
- Function: pkg.installed
- Name: httpd
- Result:True
- Comment:Package httpd is already installed.
- Started:05:01:17.491217
- Duration:1305.282 ms
- Changes:
- ———-
- ID: apache-install
- Function: pkg.installed
- Name: httpd-devel
- Result:True
- Comment:Package httpd-devel is already installed.
- Started:05:01:18.796746
- Duration:0.64 ms
- Changes:
- ———-
- ID: apache-service
- Function: service.running
- Name: httpd
- Result:True
- Comment:Service httpd has been enabled, and is running
- Started:05:01:18.798131
- Duration:1719.618 ms
- Changes:
- ———-
- httpd:
- True
- Summary
- ————
- Succeeded:3(changed=1)
- Failed:0
- ————
- Total states run:3
- [root@linux-node1 salt]#
1.7.3驗證使用saltstack安裝httpd是否成功
linux-node1:
[root@linux-node1 salt]# lsof -i:80 ##已經成功啟動
COMMAND PID USER FD TYPE DEVICE SIZE/OFF NODE NAME
httpd 7397 root 4u IPv6 46164 0t0 TCP *:http (LISTEN)
httpd 7399 apache 4u IPv6 46164 0t0 TCP *:http (LISTEN)
httpd 7400 apache 4u IPv6 46164 0t0 TCP *:http (LISTEN)
httpd 7401 apache 4u IPv6 46164 0t0 TCP *:http (LISTEN)
httpd 7403 apache 4u IPv6 46164 0t0 TCP *:http (LISTEN)
httpd 7404 apache 4u IPv6 46164 0t0 TCP *:http (LISTEN)
httpd 7405 apache 4u IPv6 46164 0t0 TCP *:http (LISTEN)
httpd 7406 apache 4u IPv6 46164 0t0 TCP *:http (LISTEN)
httpd 7407 apache 4u IPv6 46164 0t0 TCP *:http (LISTEN)
linux-node2:
[root@linux-node2 pki]# lsof -i:80
COMMAND PID USER FD TYPE DEVICE SIZE/OFF NODE NAME
httpd 12895 root 4u IPv6 47532 0t0 TCP *:http (LISTEN)
httpd 12897 apache 4u IPv6 47532 0t0 TCP *:http (LISTEN)
httpd 12898 apache 4u IPv6 47532 0t0 TCP *:http (LISTEN)
httpd 12899 apache 4u IPv6 47532 0t0 TCP *:http (LISTEN)
httpd 12901 apache 4u IPv6 47532 0t0 TCP *:http (LISTEN)
httpd 12902 apache 4u IPv6 47532 0t0 TCP *:http (LISTEN)
httpd 12906 apache 4u IPv6 47532 0t0 TCP *:http (LISTEN)
httpd 12908 apache 4u IPv6 47532 0t0 TCP *:http (LISTEN)
httpd 12909 apache 4u IPv6 47532 0t0 TCP *:http (LISTEN)
[root@linux-node2 pki]#
1.7.4使用saltstack狀態管理
[root@linux-node1 salt]# salt ‘*’ state.highstate
2.1、SaltStack之Grains數據系統
- Grains
- Pillar
2.1.1使用salt命令查看系統版本
- [root@linux-node1 salt]# salt ‘linux-node1*’ grains.ls
- linux-node1.zhurui.com:
- -SSDs
- – biosreleasedate
- – biosversion
- – cpu_flags
- – cpu_model
- – cpuarch
- – domain
- – fqdn
- – fqdn_ip4
- – fqdn_ip6
- – gpus
- – host
- – hwaddr_interfaces
- – id
- – init
- – ip4_interfaces
- – ip6_interfaces
- – ip_interfaces
- – ipv4
- – ipv6
- – kernel
- – kernelrelease
- – locale_info
- – localhost
- – lsb_distrib_codename
- – lsb_distrib_id
- – lsb_distrib_release
- – machine_id
- – manufacturer
- – master
- – mdadm
- – mem_total
- – nodename
- – num_cpus
- – num_gpus
- – os
- – os_family
- – osarch
- – oscodename
- – osfinger
- – osfullname
- – osmajorrelease
- – osrelease
- – osrelease_info
- – path
- – productname
- – ps
- – pythonexecutable
- – pythonpath
- – pythonversion
- – saltpath
- – saltversion
- – saltversioninfo
- – selinux
- – serialnumber
- – server_id
- – shell
- – virtual
- – zmqversion
- [root@linux-node1 salt]#
2.1.2系統版本相關信息:
- [root@linux-node1 salt]# salt ‘linux-node1*’ grains.items
- linux-node1.zhurui.com:
- ———-
- SSDs:
- biosreleasedate:
- 07/31/2013
- biosversion:
- 00
- cpu_flags:
- – fpu
- – vme
- – de
- – pse
- – tsc
- – msr
- – pae
- – mce
- – cx8
- – apic
- – sep
- – mtrr
- – pge
- – mca
- – cmov
- – pat
- – pse36
- – clflush
- – dts
- – mmx
- – fxsr
- – sse
- – sse2
- – ss
- – syscall
- – nx
- – rdtscp
- – lm
- – constant_tsc
- – up
- – arch_perfmon
- – pebs
- – bts
- – xtopology
- – tsc_reliable
- – nonstop_tsc
- – aperfmperf
- – unfair_spinlock
- – pni
- – ssse3
- – cx16
- – sse4_1
- – sse4_2
- – x2apic
- – popcnt
- – hypervisor
- – lahf_lm
- – arat
- – dts
- cpu_model:
- Intel(R)Core(TM) i3 CPU M 380@2.53GHz
- cpuarch:
- x86_64
- domain:
- com
- fqdn:
- linux-node1.zhurui.com
- fqdn_ip4:
- -192.168.0.15
- fqdn_ip6:
- gpus:
- |_
- ———-
- model:
- SVGA II Adapter
- vendor:
- unknown
- host:
- linux-node1
- hwaddr_interfaces:
- ———-
- eth0:
- 00:0c:29:fc:ba:90
- lo:
- 00:00:00:00:00:00
- id:
- linux-node1.zhurui.com
- init:
- upstart
- ip4_interfaces:
- ———-
- eth0:
- -192.168.0.15
- lo:
- -127.0.0.1
- ip6_interfaces:
- ———-
- eth0:
- – fe80::20c:29ff:fefc:ba90
- lo:
- -::1
- ip_interfaces:
- ———-
- eth0:
- -192.168.0.15
- – fe80::20c:29ff:fefc:ba90
- lo:
- -127.0.0.1
- -::1
- ipv4:
- -127.0.0.1
- -192.168.0.15
- ipv6:
- -::1
- – fe80::20c:29ff:fefc:ba90
- kernel:
- Linux
- kernelrelease:
- 6.32-573.el6.x86_64
- locale_info:
- ———-
- defaultencoding:
- UTF8
- defaultlanguage:
- en_US
- detectedencoding:
- UTF-8
- localhost:
- linux-node1.zhurui.com
- lsb_distrib_codename:
- Final
- lsb_distrib_id:
- CentOS
- lsb_distrib_release:
- 7
- machine_id:
- da5383e82ce4b8d8a76b5a3e00000010
- manufacturer:
- VMware,Inc.
- master:
- 168.0.15
- mdadm:
- mem_total:
- 556
- nodename:
- linux-node1.zhurui.com
- num_cpus:
- 1
- num_gpus:
- 1
- os:
- CentOS
- os_family:
- RedHat
- osarch:
- x86_64
- oscodename:
- Final
- osfinger:
- CentOS-6
- osfullname:
- CentOS
- osmajorrelease:
- 6
- osrelease:
- 7
- osrelease_info:
- -6
- -7
- path:
- /sbin:/usr/sbin:/bin:/usr/bin
- productname:
- VMwareVirtualPlatform
- ps:
- ps -efH
- pythonexecutable:
- /usr/bin/python2.6
- pythonpath:
- -/usr/bin
- -/usr/lib64/python26.zip
- -/usr/lib64/python2.6
- -/usr/lib64/python2.6/plat-linux2
- -/usr/lib64/python2.6/lib-tk
- -/usr/lib64/python2.6/lib-old
- -/usr/lib64/python2.6/lib-dynload
- -/usr/lib64/python2.6/site-packages
- -/usr/lib64/python2.6/site-packages/gtk-2.0
- -/usr/lib/python2.6/site-packages
- pythonversion:
- -2
- -6
- -6
- – final
- -0
- saltpath:
- /usr/lib/python2.6/site-packages/salt
- saltversion:
- 5.10
- saltversioninfo:
- -2015
- -5
- -10
- -0
- selinux:
- ———-
- enabled:
- True
- enforced:
- Permissive
- serialnumber:
- VMware-564d8f43912d3a99-eb c4 3b a9 34 fc ba 90
- server_id:
- 295577080
- shell:
- /bin/bash
- virtual:
- VMware
- zmqversion:
- 2.5
2.1.3系統版本相關信息:
2.1.4查看node1所有ip地址:
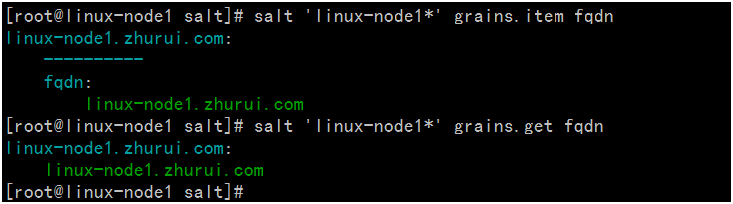
[root@linux-node1 salt]# salt ‘linux-node1*’ grains.get ip_interfaces:eth0 ##用於信息的收集
linux-node1.zhurui.com:
– 192.168.0.15
– fe80::20c:29ff:fefc:ba90


2.1.4使用Grains收集系統信息:
[root@linux-node1 salt]# salt ‘linux-node1*’ grains.get os
linux-node1.zhurui.com:
CentOS
[root@linux-node1 salt]# salt -G os:CentOS cmd.run ‘w’ ## -G:代表使用Grains收集,使用w命令,查看登錄信息
linux-node2.zhurui.com:
20:29:40 up 2 days, 16:09, 2 users, load average: 0.00, 0.00, 0.00
USER TTY FROM LOGIN@ IDLE JCPU PCPU WHAT
root tty1 – Sun14 29:07m 0.32s 0.32s -bash
root pts/0 192.168.0.101 Sun20 21:41m 0.46s 0.46s -bash
linux-node1.zhurui.com:
02:52:01 up 1 day, 22:31, 3 users, load average: 4.00, 4.01, 4.00
USER TTY FROM LOGIN@ IDLE JCPU PCPU WHAT
root tty1 – Sat20 24:31m 0.19s 0.19s -bash
root pts/0 192.168.0.101 Sun02 1.00s 1.33s 0.68s /usr/bin/python
root pts/1 192.168.0.101 Sun04 21:36m 0.13s 0.13s -bash
[root@linux-node1 salt]#
截圖如下:

2.1.5 使用Grains規則匹配到memcache的主機上運行輸入hehe
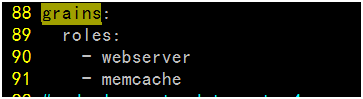
[root@linux-node1 salt]# vim /etc/salt/minion ##編輯minion配置文件,取消如下幾行注釋
88 grains:
89 roles:
90 – webserver
91 – memcache
截圖如下:
[root@linux-node1 salt]# /etc/init.d/salt-minion restart ##
Stopping salt-minion daemon: [ OK ]
Starting salt-minion daemon: [ OK ]
[root@linux-node1 salt]#
[root@linux-node1 salt]# salt -G ‘roles:memcache’ cmd.run ‘echo zhurui’ ##使用grains匹配規則是memcache的客戶端機器,然後輸出命令
linux-node1.zhurui.com:
zhurui
[root@linux-node1 salt]#
截圖如下:

2.1.5 也可以通過創建新的配置文件/etc/salt/grains文件來配置規則
[root@linux-node1 salt]# cat /etc/salt/grains
web: nginx
[root@linux-node1 salt]# /etc/init.d/salt-minion restart ##修改完配置文件以後需要重啟服務
Stopping salt-minion daemon: [ OK ]
Starting salt-minion daemon: [ OK ]
[root@linux-node1 salt]#
[root@linux-node1 salt]# salt -G web:nginx cmd.run ‘w’ ##使用grains匹配規則為web:nginx的主機運行命令w
linux-node1.zhurui.com:
03:31:07 up 1 day, 23:11, 3 users, load average: 4.11, 4.03, 4.01
USER TTY FROM LOGIN@ IDLE JCPU PCPU WHAT
root tty1 – Sat20 25:10m 0.19s 0.19s -bash
root pts/0 192.168.0.101 Sun02 0.00s 1.41s 0.63s /usr/bin/python
root pts/1 192.168.0.101 Sun04 22:15m 0.13s 0.13s -bash
grains的用法:
1.收集底層系統信息
2、遠程執行裡面匹配minion
3、top.sls裡面匹配minion
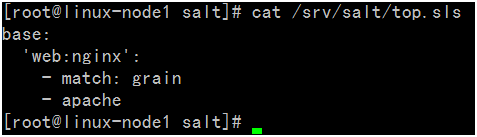
2.1.5 也可以/srv/salt/top.sls配置文件匹配minion
[root@linux-node1 salt]# cat /srv/salt/top.sls
base:
‘web:nginx’:
– match: grain
– apache
[root@linux-node1 salt]#
2.2、SaltStack之Pillar數據系統
2.2.1 首先在master配置文件552行打開pillar開關
[root@linux-node1 salt]# grep ‘^[a-z]’ /etc/salt/master
file_roots:
pillar_opts: True
[root@linux-node1 salt]# /etc/init.d/salt-master restart ##重啟master
Stopping salt-master daemon: [ OK ]
Starting salt-master daemon: [ OK ]
[root@linux-node1 salt]# salt ‘*’ pillar.items ##使用如下命令驗證
截圖如下:

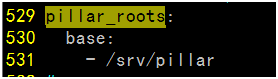
[root@linux-node1 salt]# grep ‘^[a-z]’ /etc/salt/master
529 pillar_roots: ##打開如下行
530 base:
531 – /srv/pillar
截圖如下:
[root@linux-node1 salt]# mkdir /srv/pillar
[root@linux-node1 salt]# /etc/init.d/salt-master restart ##重啟master
Stopping salt-master daemon: [ OK ]
Starting salt-master daemon: [ OK ]
[root@linux-node1 salt]# vim /srv/pillar/apache.sls
[root@linux-node1 salt]# cat /srv/pillar/apache.sls
{%if grains[‘os’] == ‘CentOS’ %}
apache: httpd
{% elif grains[‘os’] == ‘Debian’ %}
apache: apache2
{% endif %}
[root@linux-node1 salt]#
截圖如下:

接着指定哪個minion可以看到:
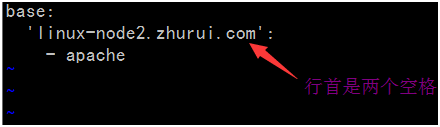
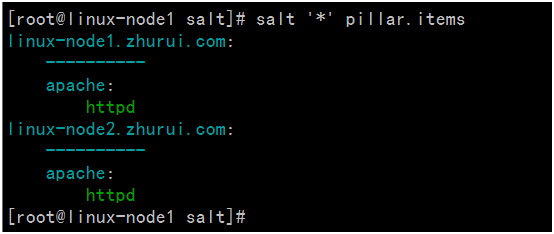
[root@linux-node1 salt]# cat /srv/pillar/top.sls
base:
‘*’:
– apache
[root@linux-node1 salt]# salt ‘*’ pillar.items ##修改完成以後使用該命令驗證
linux-node1.zhurui.com:
———-
apache:
httpd
linux-node2.zhurui.com:
———-
apache:
httpd
截圖如下:
2.2.1 使用Pillar定位主機
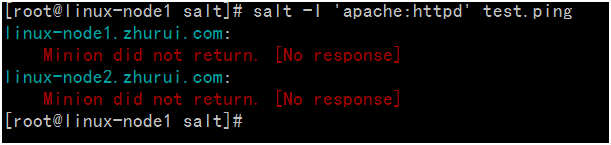
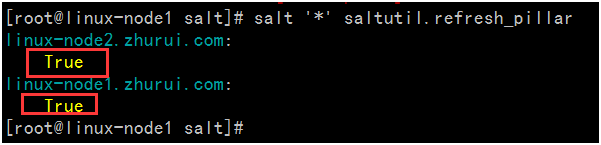
報錯處理:
[root@linux-node1 salt]# salt ‘*’ saltutil.refresh_pillar ##需要執行刷新命令
linux-node2.zhurui.com:
True
linux-node1.zhurui.com:
True
[root@linux-node1 salt]#
截圖如下:
[root@linux-node1 salt]# salt -I ‘apache:httpd’ test.ping
linux-node1.zhurui.com:
True
linux-node2.zhurui.com:
True
[root@linux-node1 salt]#
2.3、SaltStack數據系統區別介紹
| 名稱 | 存儲位置 | 數據類型 | 數據採集更新方式 | 應用 |
| Grains | minion端 | 靜態數據 | minion啟動時收集,也可以使用saltutil.sync_grains進行刷新。 | 存儲minion基本數據,比如用於匹配minion,自身數據可以用來做資產管理等。 |
| Pillar | master端 | 動態數據 | 在master端定義,指定給對應的minion,可以使用saltutil.refresh_pillar刷新 | 存儲Master指定的數據,只有指定的minion可以看到,用于敏感數據保存。 |
以下文章點擊率最高
Loading…