2、建集群,起名HR_cluster
注意:把配置HTTP会话内存到内存的复制勾上。”下一步”,
分别对应两应用服务主机,各一个SERVER,分别名称为
app1
app2
集群建完后如下
3、到系统管理->节点 中同步各节点
4、启动集群
集群可正常启动
至此,两台应用服务器的集群安装完毕!
七、 安装WEB服务器
33机安装HTTP SERVER与PLUGINS插件
程序安装包在/http_install目录下,解压解包后,执行http_ins/ihs/目录下的install.sh文件,用xmanager来执行该文件进行安装。
安装画面如下:
第一步设置端口,选择默认的
Web1机的http port 80
http administration port 8008
后面一步,在设置插件安装目录与应用服务器主机名称那里,
33对应的插件安装目录是默认的/opt/IBM/HTTPServer/plugins
对应的应用服务主机名设为 app1
(注意:34那台机安装httpserver时,选择对应的应用服务主机设为app2,其他过程都相同)
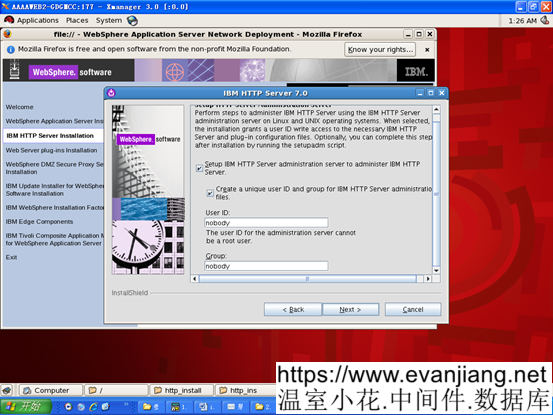
注意在管理用户与口令那里设置为admin,******
注意:因为这两个web服务器要通过另外一台应用服务器的dmgr来管理,所以这里的安全管理用户与口令要设。否则dmgr上无法管理启停。
下面这一步,设置用户与组分别为nobody,nobody
(注意:这个用户与组在etc/group,passwd,shadow中要有)

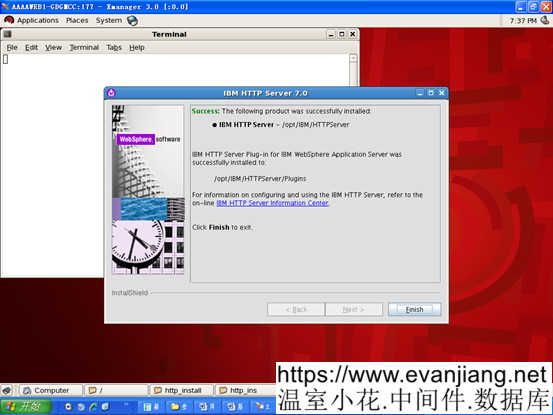
33上WEB服务器安装完成
34上HTTPSERVER完装过程类似,只是先把对应的应用服务器主机名设为app2
八、 两台WEB服务器的启动过程
正常过程:
在两台WEB服务器下,HTTPServer/bin目录下,执行如下脚本,启停apache服务
./apachectl start
./adminctl start
提示./adminctl start: admin http started
九、 回到app1的DMGR主控制台,建立WEB服务节点与启动管理。
选择系统管理->节点,
增加非受管制的两个WEB节点(前面两个app节点是受管制节点)
点添加,选择非受管节点
为WEB1机上的节点命名并设置主机名称
非受管节点名称:webnode1
主机名:web1
第一个节点添加成功
再同样操作继续添加第二个非受管节点
非受管节点名称:webnode2
主机名:web2
然后回到服务器类型下,选择WEB服务器,选择两个非受管节点,分别去创建webserver1
下一步后,增加设置属性,管理用户与口令 .用户与口令是在WEB机上安装HTTP SERVER时的设置admin,admin
完成第一个WEB节点上WEBSERVER的创建
同上操作再去完成第二个web服务节点的webserver1创建。
两个都创建完毕后。选择生成插件,
生成插件成功,提示如下:
 PLGC0005I: Plug-in configuration file = /opt/IBM/WebSphere/AppServer/profiles/Dmgr01/config/cells/APP1Cell01/nodes/webnode1/servers/webserver1/plugin-cfg.xml
 PLGC0052I: Plug-in configuration file generation is complete for the Web server. APP1Cell01.webnode1.webserver1.
 PLGC0005I: Plug-in configuration file = /opt/IBM/WebSphere/AppServer/profiles/Dmgr01/config/cells/APP1Cell01/nodes/webnode2/servers/webserver1/plugin-cfg.xml
 PLGC0052I: Plug-in configuration file generation is complete for the Web server. APP1Cell01.webnode2.webserver1.
传播插件成功,提示如下:
 PLGC0062I: The plug-in configuration file is propagated from /opt/IBM/WebSphere/AppServer/profiles/Dmgr01/config/cells/APP1Cell01/nodes/webnode1/servers/webserver1/plugin-cfg.xml to /opt/IBM/HTTPServer/Plugins/config/webserver1/plugin-cfg.xml on the Web server computer.
 PLGC0048I: The propagation of the plug-in configuration file is complete for the Web server. APP1Cell01.webnode1.webserver1.
 PLGC0062I: The plug-in configuration file is propagated from /opt/IBM/WebSphere/AppServer/profiles/Dmgr01/config/cells/APP1Cell01/nodes/webnode2/servers/webserver1/plugin-cfg.xml to /opt/IBM/HTTPServer/Plugins/config/webserver1/plugin-cfg.xml on the Web server computer.
 PLGC0048I: The propagation of the plug-in configuration file is complete for the Web server. APP1Cell01.webnode2.webserver1.
两个WEB服务已建立,并可通过DMGR 来控制启停。
2.2. 安装补丁安装工厂,并打补丁
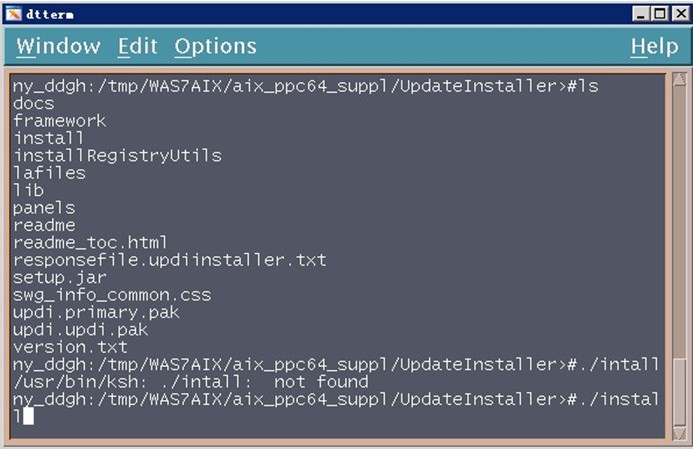
1.进入目录/tmp/WAS7LINUX/Linux_suppl/ UpdateInstaller(根据实际路径调整),执行install命令,如下图所示:
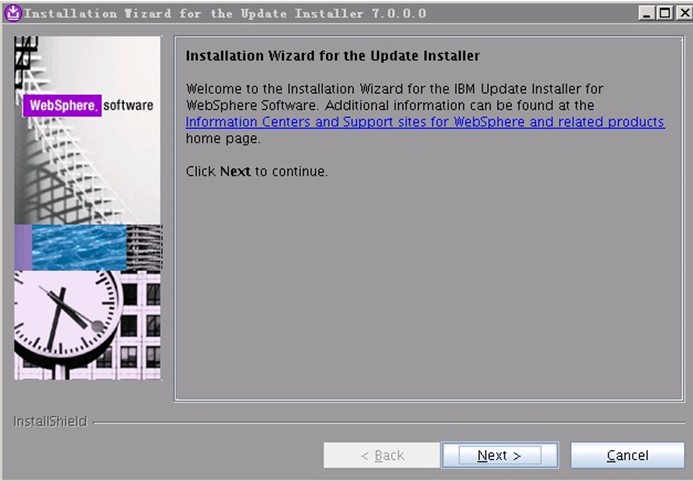
2.出现如下页面,点击”Next”:
3.出现如下页面,选择”I accept…”,点击”Next”:
以下文章点击率最高
Loading…