2、建集群,起名HR_cluster
注意:把配置HTTP會話內存到內存的複製勾上。”下一步”,
分別對應兩應用服務主機,各一個SERVER,分別名稱為
app1
app2
集群建完後如下
3、到系統管理->節點 中同步各節點
4、啟動集群
集群可正常啟動
至此,兩台應用伺服器的集群安裝完畢!
七、 安裝WEB伺服器
33機安裝HTTP SERVER與PLUGINS插件
程序安裝包在/http_install目錄下,解壓解包後,執行http_ins/ihs/目錄下的install.sh文件,用xmanager來執行該文件進行安裝。
安裝畫面如下:
第一步設置埠,選擇默認的
Web1機的http port 80
http administration port 8008
後面一步,在設置插件安裝目錄與應用伺服器主機名稱那裡,
33對應的插件安裝目錄是默認的/opt/IBM/HTTPServer/plugins
對應的應用服務主機名設為 app1
(注意:34那台機安裝httpserver時,選擇對應的應用服務主機設為app2,其他過程都相同)
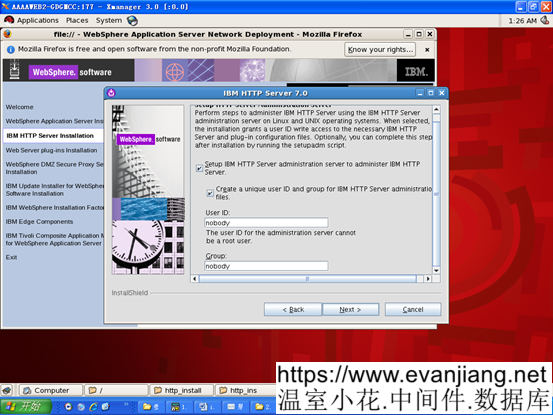
注意在管理用戶與口令那裡設置為admin,******
注意:因為這兩個web伺服器要通過另外一台應用伺服器的dmgr來管理,所以這裡的安全管理用戶與口令要設。否則dmgr上無法管理啟停。
下面這一步,設置用戶與組分別為nobody,nobody
(注意:這個用戶與組在etc/group,passwd,shadow中要有)

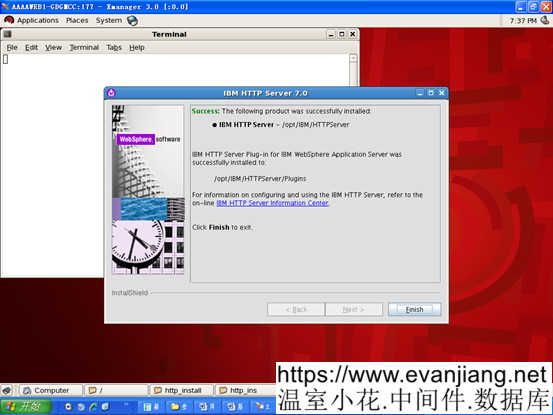
33上WEB伺服器安裝完成
34上HTTPSERVER完裝過程類似,只是先把對應的應用伺服器主機名設為app2
八、 兩台WEB伺服器的啟動過程
正常過程:
在兩台WEB伺服器下,HTTPServer/bin目錄下,執行如下腳本,啟停apache服務
./apachectl start
./adminctl start
提示./adminctl start: admin http started
九、 回到app1的DMGR主控制台,建立WEB服務節點與啟動管理。
選擇系統管理->節點,
增加非受管制的兩個WEB節點(前面兩個app節點是受管制節點)
點添加,選擇非受管節點
為WEB1機上的節點命名並設置主機名稱
非受管節點名稱:webnode1
主機名:web1
第一個節點添加成功
再同樣操作繼續添加第二個非受管節點
非受管節點名稱:webnode2
主機名:web2
然後回到伺服器類型下,選擇WEB伺服器,選擇兩個非受管節點,分別去創建webserver1
下一步後,增加設置屬性,管理用戶與口令 .用戶與口令是在WEB機上安裝HTTP SERVER時的設置admin,admin
完成第一個WEB節點上WEBSERVER的創建
同上操作再去完成第二個web服務節點的webserver1創建。
兩個都創建完畢後。選擇生成插件,
生成插件成功,提示如下:
 PLGC0005I: Plug-in configuration file = /opt/IBM/WebSphere/AppServer/profiles/Dmgr01/config/cells/APP1Cell01/nodes/webnode1/servers/webserver1/plugin-cfg.xml
 PLGC0052I: Plug-in configuration file generation is complete for the Web server. APP1Cell01.webnode1.webserver1.
 PLGC0005I: Plug-in configuration file = /opt/IBM/WebSphere/AppServer/profiles/Dmgr01/config/cells/APP1Cell01/nodes/webnode2/servers/webserver1/plugin-cfg.xml
 PLGC0052I: Plug-in configuration file generation is complete for the Web server. APP1Cell01.webnode2.webserver1.
傳播插件成功,提示如下:
 PLGC0062I: The plug-in configuration file is propagated from /opt/IBM/WebSphere/AppServer/profiles/Dmgr01/config/cells/APP1Cell01/nodes/webnode1/servers/webserver1/plugin-cfg.xml to /opt/IBM/HTTPServer/Plugins/config/webserver1/plugin-cfg.xml on the Web server computer.
 PLGC0048I: The propagation of the plug-in configuration file is complete for the Web server. APP1Cell01.webnode1.webserver1.
 PLGC0062I: The plug-in configuration file is propagated from /opt/IBM/WebSphere/AppServer/profiles/Dmgr01/config/cells/APP1Cell01/nodes/webnode2/servers/webserver1/plugin-cfg.xml to /opt/IBM/HTTPServer/Plugins/config/webserver1/plugin-cfg.xml on the Web server computer.
 PLGC0048I: The propagation of the plug-in configuration file is complete for the Web server. APP1Cell01.webnode2.webserver1.
兩個WEB服務已建立,並可通過DMGR 來控制啟停。
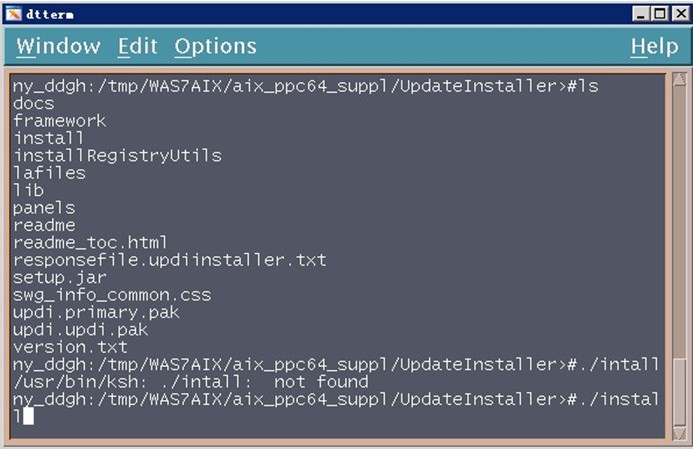
2.2. 安裝補丁安裝工廠,並打補丁
1.進入目錄/tmp/WAS7LINUX/Linux_suppl/ UpdateInstaller(根據實際路徑調整),執行install命令,如下圖所示:
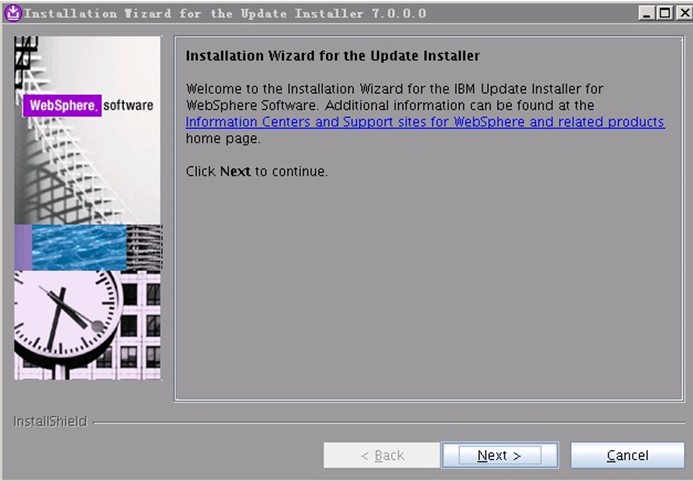
2.出現如下頁面,點擊”Next”:
3.出現如下頁面,選擇”I accept…”,點擊”Next”:
以下文章點擊率最高
Loading…